MySQL备份与恢复之MySQL 延时备份
一 为什么需要延时备份
在上一篇文章中,我们讲到MySQL备份与恢复之percona-xtrabackup实现增量备份及恢复,percona-xtrabackup是一个优秀的用于增量备份的工具。今天我们讲到的延时备份也是使用他们的产品。
以前在MySQL AB复制一文中提到了AB复制。我们首先回顾下MySQL复制的相关要点。AB复制又称主从复制,实现的是数据同步。经过以下步骤:
1)主服务器把数据更改记录到二进制日志中,这个操作叫做二进制日志事件;
2)从服务器把主服务器的二进制日志事件拷贝到自己的中继日志(relay log)中;
3)从服务器执行中继日志中的事件,把更改应用到自己的数据上。
在生产中,我们在使用 mysql AB 复制技术不但可以起到数据库层面负载均衡的能力,还可以起到备份数据的功能,但有的时候我们可能由于不小心误操作导致数据被删除,这这个时候 slave服务器上的数据也会同时被删除,如果我们能够能是的其中的一台 slave 延时备份的话, 这样就可以从 slave服务器上找回被误删的数据了。
从服务器到主服务器中拷贝二进制日志文件,如果在并发量高,网络延时严重的情况下,会对主服务器造成相当大的压力,负载高,必定会出现很多问题,比如访问延迟,IO瓶颈,网络拥塞等等。服务器压力过大是我们都不愿看到的情况,那有没有方案缓解这种情况呢?有,这就是本文讲到的延时备份。延时备份通过第三方工具,将检查同步和真正同步的时间控制在一定的范围内,而不是主服务器数据发生变化,从服务器立即去同步二进制事件到自己的中继日志中,这样的话可以大大减轻主服务器的压力,并且基于AB复制的优点,可以达到备份数据的目的。
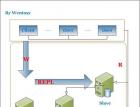
好了,看下延时备份的示意图。
二 延时备份示意图

三 延时备份模拟
网络拓扑图
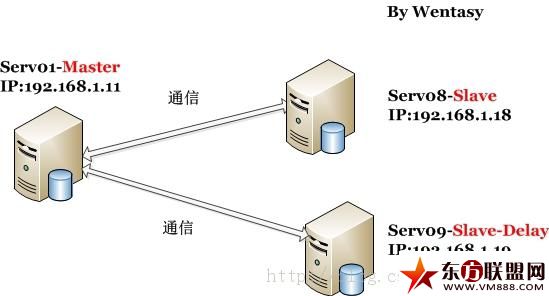
实验环境简介
serv01:主服务器 192.168.1.11serv01.host.com
serv08:及时同步服务器 192.168.1.18serv01.host.com
serv09:延时同步服务器 192.168.1.19serv08.host.com
操作系统版本
RHEL Server6.1 64位系统
使用到的软件包版本
mysql-5.5.29-linux2.6-x86_64.tar.gz
percona-toolkit-2.1.7-1.noarch.rpm
第一步,搭建环境。修改配置文件,注意每台的server-id不一致;
[root@serv01 ~]# cat /etc/my.cnf | grep server-idserver-id = 1#server-id = 2[root@serv01 ~]# /etc/init.d/mysqld startStarting MySQL SUCCESS! [root@serv08 ~]# cat /etc/my.cnf | grep server-idserver-id = 2#server-id = 2[root@serv08 ~]# /etc/init.d/mysqld startStarting MySQL SUCCESS! [root@serv09 ~]# cat /etc/my.cnf | grep server-idserver-id = 3#server-id = 2[root@serv09 ~]# /etc/init.d/mysqld startStarting MySQL SUCCESS!
第二步,serv01serv08 serv09清空日志
serv01mysql> show binary logs;+------------------+-----------+| Log_name | File_size |+------------------+-----------+| mysql-bin.000001 | 683 |+------------------+-----------+1 row in set (0.01 sec)mysql> reset master;Query OK, 0 rows affected (0.01 sec)mysql> show binary logs;+------------------+-----------+| Log_name | File_size |+------------------+-----------+| mysql-bin.000001 | 107 |+------------------+-----------+1 row in set (0.00 sec)serv08mysql> reset master;Query OK, 0 rows affected (0.02 sec)mysql> show binary logs;+------------------+-----------+| Log_name | File_size |+------------------+-----------+| mysql-bin.000001 | 107 |+------------------+-----------+1 row in set (0.00 sec)serv09mysql> show binary logs;+------------------+-----------+| Log_name | File_size |+------------------+-----------+| mysql-bin.000001 | 107 |+------------------+-----------+1 row in set (0.00 sec)mysql> reset master;Query OK, 0 rows affected (0.00 sec)mysql> show binary logs;+------------------+-----------+| Log_name | File_size |+------------------+-----------+| mysql-bin.000001 | 107 |+------------------+-----------+1 row in set (0.00 sec)
第三步,主服务器serv01创建授权用户
mysql> grant replication client, replication slave on *.* to 'larry'@'192.168.1.%' identified by 'larry';
第四步,serv08修改master设置,开启slave,查看slave状态
mysql> change master to -> master_host='192.168.1.11', -> master_user='larry', -> master_password='larry', -> master_port=3306, -> master_log_file='mysql-bin.000001', -> master_log_pos=107;Query OK, 0 rows affected (0.03 sec)mysql> start slave;Query OK, 0 rows affected (0.00 sec)mysql> show slave status G;*************************** 1. row *************************** Slave_IO_State: Waiting for master to send event Master_Host: 192.168.1.11 Master_User: larry Master_Port: 3306 Connect_Retry: 60 Master_Log_File: mysql-bin.000001 Read_Master_Log_Pos: 107 Relay_Log_File: serv08-relay-bin.000002 Relay_Log_Pos: 253 Relay_Master_Log_File: mysql-bin.000001 Slave_IO_Running: Yes Slave_SQL_Running: Yes Replicate_Do_DB: Replicate_Ignore_DB: Replicate_Do_Table: Replicate_Ignore_Table: Replicate_Wild_Do_Table: Replicate_Wild_Ignore_Table: Last_Errno: 0 Last_Error: Skip_Counter: 0 Exec_Master_Log_Pos: 107 Relay_Log_Space: 410 Until_Condition: None Until_Log_File: Until_Log_Pos: 0 Master_SSL_Allowed: No Master_SSL_CA_File: Master_SSL_CA_Path: Master_SSL_Cert: Master_SSL_Cipher: Master_SSL_Key: Seconds_Behind_Master: 0Master_SSL_Verify_Server_Cert: No Last_IO_Errno: 0 Last_IO_Error: Last_SQL_Errno: 0 Last_SQL_Error: Replicate_Ignore_Server_Ids: Master_Server_Id: 11 row in set (0.00 sec)ERROR: No query specified
第五步,serv09延时服务器修改master状态,开启slave,查看slave状态
mysql> change master to master_host='192.168.1.11', master_user='larry', master_password='larry', master_port=3306, master_log_file='mysql-bin.000001', master_log_pos=107;Query OK, 0 rows affected (0.02 sec)mysql> start slave;Query OK, 0 rows affected (0.01 sec)mysql> show slave status G;*************************** 1. row *************************** Slave_IO_State: Waiting for master to send event Master_Host: 192.168.1.11 Master_User: larry Master_Port: 3306 Connect_Retry: 60 Master_Log_File: mysql-bin.000001 Read_Master_Log_Pos: 107 Relay_Log_File: serv09-relay-bin.000002 Relay_Log_Pos: 253 Relay_Master_Log_File: mysql-bin.000001 Slave_IO_Running: Yes Slave_SQL_Running: Yes Replicate_Do_DB: Replicate_Ignore_DB: Replicate_Do_Table: Replicate_Ignore_Table: Replicate_Wild_Do_Table: Replicate_Wild_Ignore_Table: Last_Errno: 0 Last_Error: Skip_Counter: 0 Exec_Master_Log_Pos: 107 Relay_Log_Space: 410 Until_Condition: None Until_Log_File: Until_Log_Pos: 0 Master_SSL_Allowed: No Master_SSL_CA_File: Master_SSL_CA_Path: Master_SSL_Cert: Master_SSL_Cipher: Master_SSL_Key: Seconds_Behind_Master: 0Master_SSL_Verify_Server_Cert: No Last_IO_Errno: 0 Last_IO_Error: Last_SQL_Errno: 0 Last_SQL_Error: Replicate_Ignore_Server_Ids: Master_Server_Id: 11 row in set (0.00 sec)ERROR: No query specified
第六步,在没有使用延时服务器时,serv01创建测试数据库,可以看到同步服务器serv08和延时服务器serv09已经同步了
serv01mysql> create database justdb;Query OK, 1 row affected (0.01 sec)mysql> show databases;+--------------------+| Database |+--------------------+| information_schema || crm || justdb || larry || larrydb || mysql || performance_schema || test |+--------------------+8 rows in set (0.00 sec)serv08mysql> show databases;+--------------------+| Database |+--------------------+| information_schema || justdb || larrydb || mysql || performance_schema || test |+--------------------+6 rows in set (0.03 sec)serv09mysql> show databases;+--------------------+| Database |+--------------------+| information_schema || justdb || larry || larrydb || mysql || performance_schema || test |+--------------------+7 rows in set (0.00 sec)
第七步,拷贝percona-toolkit-2.1.7-1.noarch.rpm
[root@larrywen ule-mysql]# scp percona-toolkit-2.1.7-1.noarch.rpm 192.168.1.11:/optroot@192.168.1.11's password: percona-toolkit-2.1.7-1.noarch.rpm 100% 1767KB 1.7MB/s 00:00
第八步,主服务器中通过yum安装percona-toolkit-2.1.7-1.noarch.rpm
[root@serv01 opt]# yum install percona-toolkit-2.1.7-1.noarch.rpm -y
第九步,使用pt-slave-delay工具进行延时设置。可以先查看帮助。
[root@serv01 opt]# pt-slave-delay --helppt-slave-delay starts and stops a slave server as needed to make it lag behindthe master. The SLAVE-HOST and MASTER-HOST use DSN syntax, and values arecopied from the SLAVE-HOST to the MASTER-HOST if omitted. For more details,please use the --help option, or try 'perldoc /usr/bin/pt-slave-delay' forcomplete documentation.Usage: pt-slave-delay [OPTION...] SLAVE-HOST [MASTER-HOST]Options: --ask-pass Prompt for a password when connecting to MySQL --charset=s -A Default character set --config=A Read this comma-separated list of config files; if specified, this must be the first option on the command line --[no]continue Continue replication normally on exit (default yes) --daemonize Fork to the background and detach from the shell --database=s -D The database to use for the connection --defaults-file=s -F Only read mysql options from the given file --delay=m How far the slave should lag its master (default 1h). Optional suffix s=seconds, m=minutes, h=hours, d=days; if no suffix, s is used. --help Show help and exit --host=s -h Connect to host --interval=m How frequently pt-slave-delay should check whether the slave needs to be started or stopped (default 1m). Optional suffix s=seconds, m=minutes, h=hours, d=days; if no suffix, s is used. --log=s Print all output to this file when daemonized --password=s -p Password to use when connecting --pid=s Create the given PID file when daemonized --port=i -P Port number to use for connection --quiet -q Don't print informational messages about operation --run-time=m How long pt-slave-delay should run before exiting. Optional suffix s=seconds, m=minutes, h=hours, d=days; if no suffix, s is used. --set-vars=s Set these MySQL variables (default wait_timeout=10000) --socket=s -S Socket file to use for connection --use-master Get binlog positions from master, not slave --user=s -u User for login if not current user --version Show version and exit --version-check=s Send program versions to Percona and print suggested upgrades and problems (default off)Option types: s=string, i=integer, f=float, h/H/a/A=comma-separated list, d=DSN, z=size, m=timeRules: This tool accepts additional command-line arguments. Refer to the SYNOPSIS and usage information for details.DSN syntax is key=value[,key=value...] Allowable DSN keys: KEY COPY MEANING === ==== ============================================= A yes Default character set D yes Default database F yes Only read default options from the given file P yes Port number to use for connection S yes Socket file to use for connection h yes Connect to host p yes Password to use when connecting u yes User for login if not current user If the DSN is a bareword, the word is treated as the 'h' key.Options and values after processing arguments: --ask-pass FALSE --charset (No value) --config /etc/percona-toolkit/percona-toolkit.conf,/etc/percona-toolkit/pt-slave-delay.conf,/root/.percona-toolkit.conf,/root/.pt-slave-delay.conf --continue TRUE --daemonize FALSE --database (No value) --defaults-file (No value) --delay 3600 --help TRUE --host (No value) --interval 60 --log (No value) --password (No value) --pid (No value) --port (No value) --quiet FALSE --run-time (No value) --set-vars wait_timeout=10000 --socket (No value) --use-master FALSE --user (No value) --version FALSE --version-check off
第十步,serv09延时服务器中创建授权用户
mysql> grant all on *.* to 'rep'@'192.168.1.%' identified by 'larry';Query OK, 0 rows affected (0.00 sec)
第十一步,实现功能。
[root@serv01 ~]# pt-slave-delay --user='rep' --password='larry' --delay=3m --interval=20s --run-time=30m 192.168.1.192013-10-06T19:43:30 slave running 0 seconds behind2013-10-06T19:43:30 STOP SLAVE until 2013-10-06T19:46:30 at master position mysql-bin.000001/199命令解释--user='rep':延时服务器中授权用户的用户名,这里设置为rep--password='larry':延时服务器中授权用户的密码,这里设置为larry--delay=3m:延时同步的时间,这里设置为3分钟--interval=20s:检查同步的时间,这里设置为20s--run-time=30m:pt-slave-delay的运行时间,这里设置为30分钟192.168.1.19:延时服务器的IP地址
第十二步,测试,主服务器serv01创建测试数据库,可以发现同步服务器立马更新,而延时同步服务器要等3分钟之后才更新
serv01mysql> use justdb;Database changedmysql> create table test(id int);Query OK, 0 rows affected (0.01 sec)mysql> insert into test values(1);Query OK, 1 row affected (0.00 sec)serv08 mysql> select * from justdb.test;+------+| id |+------+| 1 |+------+1 row in set (0.00 sec)serv09mysql> select * from justdb.test;ERROR 1146 (42S02): Table 'justdb.test' doesn't exist三分钟过后查看延时服务器已经同步成功[root@serv01 ~]# pt-slave-delay --user='rep' --password='larry' --delay=3m --interval=20s --run-time=30m 192.168.1.192013-10-06T19:43:30 slave running 0 seconds behind2013-10-06T19:43:30 STOP SLAVE until 2013-10-06T19:46:30 at master position mysql-bin.000001/1992013-10-06T19:43:50 slave stopped at master position mysql-bin.000001/1992013-10-06T19:44:10 slave stopped at master position mysql-bin.000001/1992013-10-06T19:44:30 slave stopped at master position mysql-bin.000001/4922013-10-06T19:44:50 slave stopped at master position mysql-bin.000001/4922013-10-06T19:45:10 slave stopped at master position mysql-bin.000001/4922013-10-06T19:45:30 slave stopped at master position mysql-bin.000001/4922013-10-06T19:45:50 slave stopped at master position mysql-bin.000001/4922013-10-06T19:46:10 slave stopped at master position mysql-bin.000001/4922013-10-06T19:46:30 no new binlog events2013-10-06T19:46:50 slave stopped at master position mysql-bin.000001/4922013-10-06T19:47:10 slave stopped at master position mysql-bin.000001/4922013-10-06T19:47:30 START SLAVE until master 2013-10-06T19:44:30 mysql-bin.000001/4922013-10-06T19:47:50 slave running 0 seconds behind2013-10-06T19:47:50 STOP SLAVE until 2013-10-06T19:50:50 at master position mysql-bin.000001/4922013-10-06T19:48:10 slave stopped at master position mysql-bin.000001/4922013-10-06T19:48:30 slave stopped at master position mysql-bin.000001/4922013-10-06T19:48:50 slave stopped at master position mysql-bin.000001/4922013-10-06T19:49:10 slave stopped at master position mysql-bin.000001/4922013-10-06T19:49:30 slave stopped at master position mysql-bin.000001/4922013-10-06T19:49:50 slave stopped at master position mysql-bin.000001/4922013-10-06T19:50:10 slave stopped at master position mysql-bin.000001/4922013-10-06T19:50:30 slave stopped at master position mysql-bin.000001/4922013-10-06T19:50:50 no new binlog events2013-10-06T19:51:10 slave stopped at master position mysql-bin.000001/4922013-10-06T19:51:30 slave stopped at master position mysql-bin.000001/4922013-10-06T19:51:50 slave stopped at master position mysql-bin.000001/4922013-10-06T19:52:10 slave stopped at master position mysql-bin.000001/4922013-10-06T19:52:30 slave stopped at master position mysql-bin.000001/4922013-10-06T19:52:50 slave stopped at master position mysql-bin.000001/4922013-10-06T19:53:10 slave stopped at master position mysql-bin.000001/4922013-10-06T19:53:30 slave stopped at master position mysql-bin.000001/4922013-10-06T19:53:50 slave stopped at master position mysql-bin.000001/4922013-10-06T19:54:10 no new binlog events2013-10-06T19:54:30 slave stopped at master position mysql-bin.000001/4922013-10-06T19:54:50 slave stopped at master position mysql-bin.000001/4922013-10-06T19:55:10 slave stopped at master position mysql-bin.000001/4922013-10-06T19:55:30 slave stopped at master position mysql-bin.000001/4922013-10-06T19:55:50 slave stopped at master position mysql-bin.000001/4922013-10-06T19:56:10 slave stopped at master position mysql-bin.000001/4922013-10-06T19:56:30 slave stopped at master position mysql-bin.000001/4922013-10-06T19:56:50 slave stopped at master position mysql-bin.000001/4922013-10-06T19:57:10 slave stopped at master position mysql-bin.000001/4922013-10-06T19:57:30 no new binlog events2013-10-06T19:57:50 slave stopped at master position mysql-bin.000001/4922013-10-06T19:58:10 slave stopped at master position mysql-bin.000001/4922013-10-06T19:58:30 slave stopped at master position mysql-bin.000001/4922013-10-06T19:58:50 slave stopped at master position mysql-bin.000001/4922013-10-06T19:59:10 slave stopped at master position mysql-bin.000001/4922013-10-06T19:59:30 slave stopped at master position mysql-bin.000001/4922013-10-06T19:59:50 slave stopped at master position mysql-bin.000001/4922013-10-06T20:00:10 slave stopped at master position mysql-bin.000001/4922013-10-06T20:00:30 slave stopped at master position mysql-bin.000001/4922013-10-06T20:00:50 no new binlog events2013-10-06T20:01:10 slave stopped at master position mysql-bin.000001/4922013-10-06T20:01:30 slave stopped at master position mysql-bin.000001/4922013-10-06T20:01:50 slave stopped at master position mysql-bin.000001/4922013-10-06T20:02:10 slave stopped at master position mysql-bin.000001/4922013-10-06T20:02:30 slave stopped at master position mysql-bin.000001/4922013-10-06T20:02:50 slave stopped at master position mysql-bin.000001/4922013-10-06T20:03:10 slave stopped at master position mysql-bin.000001/4922013-10-06T20:03:30 slave stopped at master position mysql-bin.000001/4922013-10-06T20:03:50 slave stopped at master position mysql-bin.000001/4922013-10-06T20:04:10 no new binlog events2013-10-06T20:04:30 slave stopped at master position mysql-bin.000001/4922013-10-06T20:04:50 slave stopped at master position mysql-bin.000001/4922013-10-06T20:05:10 slave stopped at master position mysql-bin.000001/4922013-10-06T20:05:30 slave stopped at master position mysql-bin.000001/4922013-10-06T20:05:50 slave stopped at master position mysql-bin.000001/4922013-10-06T20:06:10 slave stopped at master position mysql-bin.000001/4922013-10-06T20:06:30 slave stopped at master position mysql-bin.000001/4922013-10-06T20:06:50 slave stopped at master position mysql-bin.000001/4922013-10-06T20:07:10 slave stopped at master position mysql-bin.000001/4922013-10-06T20:07:30 no new binlog events2013-10-06T20:07:50 slave stopped at master position mysql-bin.000001/4922013-10-06T20:08:10 slave stopped at master position mysql-bin.000001/4922013-10-06T20:08:30 slave stopped at master position mysql-bin.000001/4922013-10-06T20:08:50 slave stopped at master position mysql-bin.000001/4922013-10-06T20:09:10 slave stopped at master position mysql-bin.000001/4922013-10-06T20:09:30 slave stopped at master position mysql-bin.000001/4922013-10-06T20:09:50 slave stopped at master position mysql-bin.000001/4922013-10-06T20:10:10 slave stopped at master position mysql-bin.000001/4922013-10-06T20:10:30 slave stopped at master position mysql-bin.000001/4922013-10-06T20:10:50 no new binlog events2013-10-06T20:11:10 slave stopped at master position mysql-bin.000001/4922013-10-06T20:11:30 slave stopped at master position mysql-bin.000001/4922013-10-06T20:11:50 slave stopped at master position mysql-bin.000001/4922013-10-06T20:12:10 slave stopped at master position mysql-bin.000001/4922013-10-06T20:12:30 slave stopped at master position mysql-bin.000001/4922013-10-06T20:12:50 slave stopped at master position mysql-bin.000001/4922013-10-06T20:13:10 slave stopped at master position mysql-bin.000001/4922013-10-06T20:13:30 slave stopped at master position mysql-bin.000001/4922013-10-06T20:13:30 Setting slave to run normallymysql> select * from justdb.test;+------+| id |+------+| 1 |+------+1 row in set (0.00 sec)
四 附延时备份脚本
#!/bin/bash## chkconfig: - 88 12# description: the mysql ab delay scriptshost=192.168.100.54user=reppassword=larrydelay=2min=15sprog=/usr/bin/pt-slave-delay. /etc/init.d/functionsstart() { echo -n "Starting `basename $prog`..." daemon $prog --host=$host --user=$user --password=$password --delay=$delay --interval=$in --daemonize --log=/var/log/mysql-delay.log echo}stop() { echo -n "Stopping `basename $prog`..." killproc $prog echo}case "$1" in start) start ;; stop) stop ;; restart) stop start ;; *) echo "Usage: $0 {start|stop|restart}" exit 1esac
- 10-26高手浅谈MySQL数据库的几个安全问题
- 10-26MySQL False 黑客注入及技巧总结
- 02-2514种最好方法保护MySQL全面安全
- 12-23mysqltoolkit用法[备忘]
- 12-23一个基于MySQL的Key-List存储方案
- 12-21ODBC中遇到的错误
- 12-21使用mysql遇到的问题
- 12-21PAIP.MYSQLSLEEP连接太多解决

- 01-11全球最受赞誉公司揭晓:苹果连续九年第一
- 12-09罗伯特·莫里斯:让黑客真正变黑
- 12-09谁闯入了中国网络?揭秘美国绝密黑客小组TA
- 12-09警示:iOS6 惊现“闪退”BUG
- 04-29通用智能人“通通”亮相中关村论坛
- 04-29拼多多投入45亿补贴,助力上海“五五购物节
- 04-29通义千问再开源 推出最大尺寸1100亿参数模型
- 04-29【环球视线】比亚迪交付首列出海云轨
- 04-21中国产品数字护照体系加速建设
![mysqltoolkit用法[备忘]](/d/file/database/MYSQL/2013-12-23/04bc6d6d44f8997289d0a8a3716d5896.png)


 粤公网安备 44060402001498号